Showing posts with label tutorial. Show all posts

Monday, November 21, 2011

Three Button Wrap

A little over a year ago, a friend asked me to make a wrap that she saw in some expensive store.  It was knitted, of course, and back then I didn't knit yet.  So I made one in Tunisian crochet and I *wish* I would have written down the instructions at the time.  Anyway, fast forward one year and sure enough, she asked for another one!  This time, I've got the pattern to share.  Not so much a pattern as it is a formula.  This can be worked in any stitch pattern, crochet, knit, Tunisian crochet, you name it.
 This wrap is basically a wide, long rectangle, with approximate dimensions of 18" X 72".  Mentally break up the wrap into 3 equal sections.  In the last third of the wrap, evenly place button holes, approximately 6" apart.  You can add or take away space depending on your preferences and choice of buttons.  Use any yarn, any hook, and/or any needles.

Start with a foundation single crochet (or chain) equaling your desired length.  In the example shown it is 18".  Continue in desired stitch pattern for 54", place button hole, continue 6" and place another button hole, continue 6", place last button hole, and finish off wrap with a final 6" of pattern stitches.  I placed my button holes approximately 2" from the edge of the fabric.


Here is a very basic diagram showing the dimensions.  Forgive my pathetic Paint skills.  LOL!  The blue dots represent the button holes.  Can't wait to see what you make with it!


Thursday, October 20, 2011

Bamboo stitch beanie

A few weeks ago I started experimenting with the knitted bamboo stitch.  I really liked the look and decided I wanted to translate its beauty into Tunisian crochet.  Once I got it down, I made a hat in the round using the stitch and two complimentary colors.  I really, really like it!  So, I want to share it with you!


Bamboo Stitch Beanie

Materials:
Patons Silk Bamboo (DK weight, 70% Bamboo
30% Silk, 102 yds/2.3 oz per skein) – 1 skein Sea (MC), 1 skein Sapphire (CC)
US J (6.00mm) double-ended hook
Tapestry needle

Gauge: not especially important, and will be determined by yarn and hook choice.

Abbreviations:
tfs = Tunisian full stitch (insert hook in space between vertical bars and draw up loop)
y/o = yarn over (increase made)
sl st = slip stitch
ch = chain

Special Stitch:
Bamboo stitch = y/o, tfs in each of next 2 spaces, pull last two loops on hook back through y/o, at the same time.  For a video tutorial on Bamboo stitch, click here.

Notes:
  • Any yarn/hook combination can be used with this pattern.
  • All return rows are as normal: ch 1 for first stitch, y/o and pull through 2 loops for all subsequent stitches
  • All stitches are created knitwise, meaning the hook is inserted from front to back, through the fabric.
  • This pattern can be made in 2 colors, as shown, or using one color throughout.
  • Pictured hat is made extra long for slouchy look, but can also be worn with a fold-up brim. Note that the bamboo stitch is not very stretchy. It is recommended that a test swatch be done in desired yarn.
Pattern:

Ch 75 (or any odd number of stitches, enough to loosely fit around your head). Join with a sl st to first ch. Do not twist chain.
Row 1: Pull up loop in the back hump of each ch around.
Row 2: Work bamboo stitch pattern

Repeat Row 2 until desired length is reached. Hat pictured is 9” tall.

Finishing:

Pull the last CC stitch through final forward pass stitch. Cut both yarns, leaving about a 10” tail of CC. Thread CC through tapestry needle, weave in and out of the topmost stitches, pull tight to gather the top of the hat, and secure the yarn. Weave in ends.

Special thanks to Chaitanya Muralidhara for her technical editing expertise!


Monday, September 27, 2010

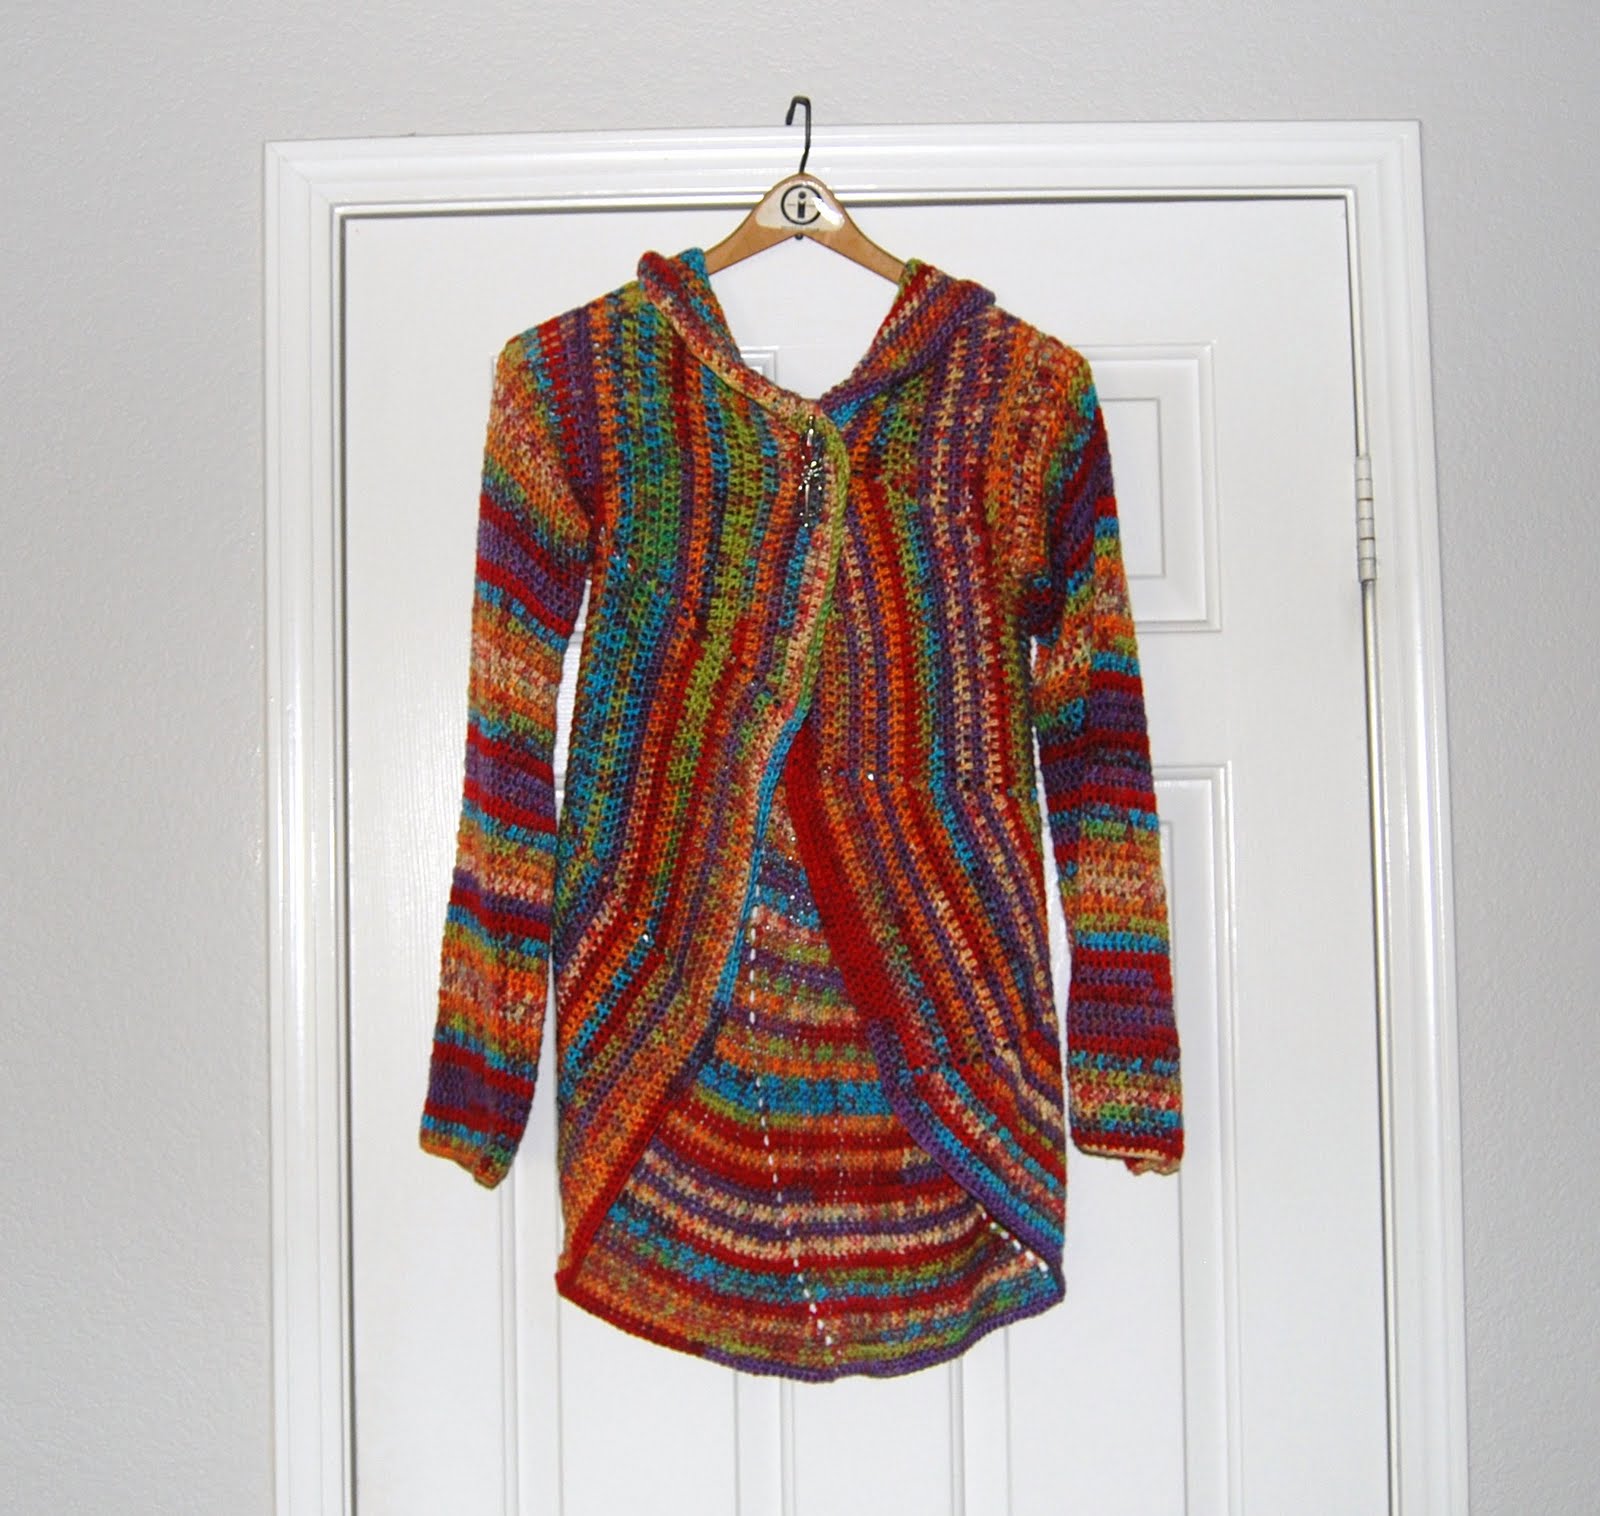
My version of the pinwheel sweater


So, I saw this amazing circle sweater, but alas, it's knitted. Although I've recently learned to knit, I am nowhere near ready for that sweater, or the amount of time it would take to complete said sweater! So, why not make one for myself. I mean, really, it's just a giant circle. Anyway, thought I would share with you all how I made it. Therefore, this isn't really a pattern so much as it is a tutorial. And because of the nature of this pattern, it can be altered to fit a child too.


Pinwheel Sweater


I used about 7 skeins of Premier Yarns Deborah Norville Serenity Garden in Gems colorway. The package says it's a fine weight yarn, other sources list it as sport weight. I think it's somewhere in between.

H hook

Fdc (foundation double crochet) - here is a link to an excellent video tutorial.
Body

Note: All stitches are made in dc, so always sk ch 1 sp, unless otherwise noted. Sl st to top of ch 3 to join each round.

Ch 4, 11 dc in 4th ch fr hk (12 dc)
Ch 4 (counts as dc and ch 1), *dc, ch 1 in next dc*. Repeat from * to * to end. (12 dc, 12 ch 1)
Ch 3, dc in same st, ch 1, *2dc, ch 1 in next dc.* Repeat from * to * to end. (24 dc, 12 ch 1)
Ch 3, dc in same st, dc, ch 1, *2dc, dc, ch 1.* Repeat from * to * to end. (36 dc, 12 ch 1)
Ch 3, dc in same st, dc, dc, ch 1, *2dc, dc, dc, ch 1.* Repeat from * to * to end. (48 dc, 12 ch 1)
Ch 3, dc in same st, dc, dc, dc ch 1, *2dc, dc, dc, dc, ch 1.* Repeat from * to * to end. (60 dc, 12 ch 1)

Continue increasing as in pattern above until circle reaches diameter of the distance between the outer edges of your shoulders. For example, mine was 17".  If in doubt, add a little room.  You don't want it to be too tight!  Now you are going to make the holes for the sleeves.

Continue in pattern until first ch 1. Ch 1, then fdc number of stitches required and reattach at next set of increases by dcing into the first of the two dcs. To make that a bit simpler, let me give you my example. When I made my sleeves, I had 19 st between ch 1 spaces. So, I fdc 19 st and reattached with 2 dc in the next set. Continue as before for the next 7 sets. Ch 1, and fdc number required again and reattach as before. Continue pattern and sl st to join the round.

At this point, lay the circle out flat. The distinct pinwheel pattern has 12 sets or sections. There should be 3 sections between the armholes at the top, and there should be 7 sections between the armholes at the bottom. Also at this time, you should try it on to make sure there is enough room between the shoulders and to make sure the armholes are large enough.

Continue in pattern until you can put on the sweater and the fronts easily overlap each other, or until you like it. You may find a point where it gets too long in the back for your liking. Just stop there! No rhyme or reason, just make it until you are satisfied.

Here's what it should look like before attaching the sleeves.


Arms


Notes:
There will be no increases made in the sleeves or they will be way too big! Also, you will not be joining the rounds. Count the number of stitches around and divide by 2; this will be your halfway number.

At the point where the fdc joins the sweater, join the yarn and ch 3. Dc next stitch. Continue dc until you reach your halfway number, ch 1, sk 1. Continue with your second half, dcing in each st as you go, until the end. Ch 1, sk 1. Dc in second dc (skipping ch 3 from previous round) and across until you reach ch 1 sp. Dc in ch 1 sp, ch 1, sk 1. *Dc around until ch 1 sp, dc in ch 1 sp, ch 1, sk 1* Repeat from * until you reach the desired length. Try on regularly to make sure of fit.

Now, the very nature of this sweater means that it will just fall right off without some sort of closure device. I use a hairpin as a shawl pin, but any shawl pin will do.

Here is a pic of the front where you can kinda see my hair pin closure.


I hope I made this clear enough! Enjoy!

Thursday, January 28, 2010

Free bag pattern! Stash buster bag!

I guess this blog is turning into a free pattern blog. LOL! Anyway, I've got another one to share with you...this time, a bag! It's more of a tutorial than a pattern, but whatever. I had a couple skeins of Impeccable yarn from the craft store, and to be honest, I didn't really want to use 'em for anything...um...wearable. Too scratchy! HOWEVER, they made for AWESOME bag yarn! I think I may buy more of it in fun colors to make other bags. This bag worked up really quickly, but did require some sewing...there...now you've been warned. :)

Stash Buster Bag


Materials needed:


2 skeins of any ww yarn (use up stash of cheap yarn, in same, coordinating, or contrasting colors)
N hook
handles
fat quarter or other scrap fabric to line with
usual sewing supplies
*glue gun
*pin backing


*required for flower, but flower is optional


Pattern (hold 2 strands together):


Chain any odd number of chains

Row 1: Sc in 2nd ch from hook, dc in next st, *sc in next, dc in next*. Repeat from * to end. You should end with a dc.


Row 2: Ch 1, sc in first st, dc in next st, *sc in next, dc in next*. Repeat from * to end. You should end with a dc.

Repeat Row 2 until you've reached your desired length.


Fold the piece together and sc or sl st the sides together. Attach handles using sc method or whipstitch. Line the bag however you like. Sorry...no pro at this. :) For the flower, I used the one from the Lion Brand Blooming Bag pattern. I really like it. Just glue a pin backing on the flower and pin on the bag.


In another post, I will show some pics of other bags I made with this stitch pattern. I am sure it has a name, but I don't know what it is. It creates a cool texture and because you use two strands together and a big hook, it moves so quickly! Plus, it's a good way to get rid of some of that crap yarn you KNOW you've got sitting in your bin somewhere....

Saturday, January 16, 2010

Seamless, beaded cancer cap


Well, it's about time for another free pattern...dontcha think?! I've been on a beading kick lately, as well as pumping out a ton of caps for my fave cancer charity, Knots of Love. Anyway, beads typically fall to the back of crochet work, so I tried for HOURS to figure out a way to keep my beads to the front. Mission accomplished! So, with no further ado...enjoy! And please make some caps for those in need!


Seamless, beaded charity cap
NOTES: WW yarn, I hook, place stitch marker at beginning of each round, pre-string desired number of beads

PATTERN:
Round 1: Ch 3 (counts as dc), 11 dc into 3rd ch from hk (12 dc)
Round 2: 2dc in first dc of previous round, 2 dc in each dc around (24 dc)
Round 3: 2dc in first dc of previous round, 1 dc in next st, *2dc in next st, 1 dc in next st*, *repeat to end of round (36 dc)
Round 4: 2dc in first dc of previous round, 1 dc in next 2 sts, *2dc in next st, 1 dc in next 2 st*, *repeat to end of round (48 dc)
Round 4: 2dc in first dc of previous round, 1 dc in next 3 sts, *2dc in next st, 1 dc in next 3 st*, *repeat to end of round (60 dc)
Round 5 – to finish: dc in each dc.

BEADING:
When the cap reaches about 2” from the desired length, slide first bead down. Insert hook into same st as dc just made, BEHIND working yarn, making sure bead is in FRONT of work, sl st bead into place. Dc in next two st and repeat to end of round. Complete one round with beads, and then one without. Or, put beads on every two st to the end of the hat. Or just one row of beads at the bottom of the hat. So many possibilities! Be absolutely sure that the beads are sitting on top of your work. No cancer patient is going to want beads scratching up their lovely heads.


this is what your work should look like from the back...
And, tah dah! My first video tutorial. This should help explain the beading process...

Thursday, October 1, 2009

update on my clan

Well, it's been crazy. As usual. I've been sewing as much as I can, making super cute baby shoes, purses...well, you name it. Now how can I possibly find time to sew and crochet when I have so many small children? Take a look at the dark circles under my eyes and you will see the answer. I am sleep deprived. But I gladly give up sleep to craft. Why, you ask? Because if I don't have a creative outlet, I will go insane. So it sucks for my health, but it's good for the health of my family. LOL! When I'm stressed, I sew. When I'm worried, I crochet. With two active sons and a daughter that's kept me on the brink of a mental breakdown, it's no wonder I never sleep...but damn I make lots of things!

So, to add to my stress levels, my daughter appears to be suffering from the same type of asthma my eldest son has. On a routine visit, a new doctor was listening to her breathe and taking quite some time. He turned to me and said something that just took me by surprise. He said, "I want to get a chest Xray because I hear a heart murmur. The last Xray you had for her showed an enlarged heart, and I want to see for myself." Well, I was unaware of any enlarged heart, and I was instantly worried. Apparently, heart disease can be masked by symptoms of asthma.

Two EKGs, and echocardiogram and another chest Xray later showed that my baby does indeed have an enlarged heart and blood vessels because, get this, she has a large hole in her heart. It's called an atrial septal defect, ASD. Luckily, because he caught it early, it's fixable and should not pose any problems in her little life. It's not the cause of the asthma, which was not a surprise to me because we have asthma in the family. According to the cardiologist, lots of babies have small holes in their hearts but they heal themselves and no one ever knows about it. Every once in awhile though, the holes are quite large and have to be medically addressed. If my new pediatrician had not listened, really listened, we might not have known until she was older and possibly symptomatic. We went in for asthma and came out with a heart defect, although she definitely still also has asthma.

When it rains it pours. So, does this mean I will have to stress about her for the rest of her life? Have to? No. But will I? Abso-frickin'-lutely.

Anyway, I am going to post a tutorial on a purse pretty soon here. Working on it and taking pics now! Check back later...

Friday, September 18, 2009

I'm baaaaaccckkk

Well, I've been busy. Of course, that's an understatement to anyone with three kids. LOL! I've been really sewing up a storm though. I am notorious for screwing up anything and everything I try to make; it's part of the adventure. If it takes 3 hours to sew a bag, it takes me an extra three hours to rip out all the seams I messed up and start again. But, what can you do? I am finishing a bag right now that is my first attempt at a diaper bag. Well, I wanted a diaper bag that I was not embarrassed to carry about in public. It seems all diaper bags are so...well, Mom-ish. I wanted something that looked like a killer stylish bag, but just happened to carry bottles, diapers, binkies, etc. It may not look like much now, but it's going to be awesome. Of course, that's if I don't screw it up...which I most likely will. :)


Oh, and here's a picture of my crafting area. See how messy it is? I have bins of yarns and material. I am such a lucky gal that my hubby created this space for me!


Check back soon for a gusseted pocket tutorial. I have no idea how to make one, I can't find a decent tutorial online anywhere, so I am going to figure it out (painfully and with good use of my seam ripper, I'm sure) and then I am going to share with everyone.

Oh, and I had my first craft show! It was total crap and I didn't sell a thing, but that could be because no one came. It was over 100 degrees and it's a brand new show...no one knows about it yet. But hey, at least I tried! I am fired up now and applying for three more (different!) shows!