Showing posts with label crochet. Show all posts

Friday, September 21, 2012

Erin top - free pattern!

Here is a Tunisian crochet top I worked out recently.  It couldn't be more simple!  It's just two large rectangles, seamed together on the sides and at the top.

Experience Level:
Beginner +

Measurements:
Finished chest measurements approximately 31” (35”, 39”, 43”, 47”, 51”)
Sizes XS (S, M, L, XL, XXL)

Materials: 
4 (4, 4, 5, 5, 6) balls Plymouth Encore DK, 75% Acrylic, 25% Wool, 50g (1.75 oz)/137m (150 yds), color Christmas Green
5.00mm H Tunisian hook, or hook required to obtain gauge

Gauge: 15 stitches X 16 rows = 4”, in Tunisian reverse stitch.  

Terms:
Ch - chain
ExTks - extended Tunisian knit stitch.  Insert hook knitwise (from front to back, through fabric), pull up loop, ch 1
ExTrs - extended Tunisian reverse stitch.  Insert hook from right to left, through back of stitch, pull up loop, ch 1
Trs - Tunisian reverse stitch
Sl st - slip stitch

Notes:
  • This pattern is written to be worked flat and then seamed.
  • Pattern is written for size XS, with all other sizes noted in ( ).
  • All return rows are completed as normal (ch 1, y/o and pull through two loops for remainder of row).
  • Note that the loop on the hook at the beginning of each row is always the first stitch, and that the last stitch of each row is always tks (or an extended stitch).

Pattern:
Make 2
Ch 56 (65, 71, 79, 86, 94)
Row 1:  Pull up loop in each stitch across.
Rows 2 - 4:  Trs each stitch across. 
Row 5:  Ch 1, ExTrs in each stitch across.
Rows 6 - 8:  Ch 1, ExTks in each stitch across.
Repeat Rows 2 - 8:  7 (7, 8, 8, 9, 9) more times.
Repeat Rows 2 - 4: one more time (all sizes).

Loosely bind off using sl st (as if making a Trs).

Blocking:
Block each rectangle to the following dimensions
XS - 15.5” wide X 21” long
S - 17.5” wide X 21” long
M - 19.5” wide X 22” long
L - 21.5” wide X 22” long
XL - 23.5” wide X 23” long
XL - 25.5” wide X 23” long


Finishing:
With right sides together, seam 11” (11”, 11.5”, 11.5”, 12”, 12”) from bottom hem, up the sides.  Leave remaining fabric unseamed for armhole.
With right sides together, seam 4” (4”, 4.25”, 4.25”. 4.5”, 4.5”) from the top of each rectangle, forming the shoulders.

Turn right side out, and enjoy this simple mesh top, suitable for so many summer occasions!

Thursday, February 2, 2012

Tunisian knit headband


I know you've all seen 'em.  Cute little teenagers running around with knitted headband/earwarmers on.  Oh to be young and cute again.  But I digress.  My neighbor asked if I could make one of them for her, and having neglected my knitting needles for awhile, I decided to take up the challenge.

Ahem, now I remember why I don't knit much.  It's soooooooo sloooooooowwww.  I got about 4 hours and 4" into it and chucked my needles into the fireplace.  Turned to my trusty Tunisian hooks and within 2 hours, I had a cute headband and a fun little flower on a pin.  So cute, in fact, that I had to make another one for myself.  This one adorned with buttons.

And, because I learned to share in Kindergarten, I decided to write down the formula for all to enjoy.  I say formula because you really can use any hook/yarn combination, as far as I can tell.  Since I have not tried it in all possible hook/yarn combinations, I am going to leave it up to the user to find out the hard way if it works or not.  Lucky you...

NOTES:
  1. All return rows are as normal, except the buttonhole row.  
  2. For the buttonhole, skip the stitch where the buttonhole will be.  On the return row, ch 1 over the skipped stitch, and continue the return row as normal.
  3. The buttonhole size and corresponding button will be determined by the yarn/hook being used.  If you wish to have a larger button but are using thinner yarn, I would recommend starting with Ch 7.
  4. M1 (make 1) directions - insert hook knitwise through fabric in the space *between* the stitches.  Pull up loop.  Increase made.
  5. Tks - Tunisian knit stitch (but I am guessing you already knew that)

Pattern/Formula

Ch 5
Row 1: pick up each loop across
Row 2 - 5: tks across row
Row 6:  find center stitch.  Tks across to center stitch, M1, tks center stitch, M1, tks across remaining stitches.
Rows 7 - 9: tks across row
Repeat Rows 6 - 9 until piece measures 3.5" in width.  Place marker on last increase row.  Measure the length from beginning to this marker (Measurement A).

Total length of the headband should be no more than about 18".  I know your head is bigger than that, but believe me, the yarn will stretch.  Double your measurement and subtract it from 18".  This number (Measurement B) will be the main length of the headband.  Continue in tks across each row until you reach Measurement B.  Now begin your decreases...

Row 1:  find center stitch.  Tks across to one stitch before the center stitch.  Skip next stitch, tks center stitch, skip next stitch, tks across remaining stitches.
Row 2 - 4: tks across row
Repeat Rows 1 - 4 until only 5 (or more, depending on your initial chain) stitches remain.
Complete on more row of tks.
Buttonhole row:  find center stitch.  Tks across to center stitch, skip stitch, tks remaining stitches.  On the return row, ch 1 for skipped stitch.
Complete 2 more rows in tks, bind off in your preferred method.  Fasten off, unless doing Trim.

Trim (optional)
Ch 1, turn to work the lengthwise side of the headband. *Sl st, ch 1.  Repeat for every stitch around the headband, making a ch 2 at the corners.  Join with a sl st at the bind off row.  Fasten off.  Sew on a button, and any other decorations you want.

So, for the tan headband I made, my length up to the marker was 5".  The main body was 8" and the decrease section was 5".  This makes a total of 18".  I used worsted weight and a J hook.


Monday, November 21, 2011

Three Button Wrap

A little over a year ago, a friend asked me to make a wrap that she saw in some expensive store.  It was knitted, of course, and back then I didn't knit yet.  So I made one in Tunisian crochet and I *wish* I would have written down the instructions at the time.  Anyway, fast forward one year and sure enough, she asked for another one!  This time, I've got the pattern to share.  Not so much a pattern as it is a formula.  This can be worked in any stitch pattern, crochet, knit, Tunisian crochet, you name it.
 This wrap is basically a wide, long rectangle, with approximate dimensions of 18" X 72".  Mentally break up the wrap into 3 equal sections.  In the last third of the wrap, evenly place button holes, approximately 6" apart.  You can add or take away space depending on your preferences and choice of buttons.  Use any yarn, any hook, and/or any needles.

Start with a foundation single crochet (or chain) equaling your desired length.  In the example shown it is 18".  Continue in desired stitch pattern for 54", place button hole, continue 6" and place another button hole, continue 6", place last button hole, and finish off wrap with a final 6" of pattern stitches.  I placed my button holes approximately 2" from the edge of the fabric.


Here is a very basic diagram showing the dimensions.  Forgive my pathetic Paint skills.  LOL!  The blue dots represent the button holes.  Can't wait to see what you make with it!


Thursday, October 20, 2011

Bamboo stitch beanie

A few weeks ago I started experimenting with the knitted bamboo stitch.  I really liked the look and decided I wanted to translate its beauty into Tunisian crochet.  Once I got it down, I made a hat in the round using the stitch and two complimentary colors.  I really, really like it!  So, I want to share it with you!


Bamboo Stitch Beanie

Materials:
Patons Silk Bamboo (DK weight, 70% Bamboo
30% Silk, 102 yds/2.3 oz per skein) – 1 skein Sea (MC), 1 skein Sapphire (CC)
US J (6.00mm) double-ended hook
Tapestry needle

Gauge: not especially important, and will be determined by yarn and hook choice.

Abbreviations:
tfs = Tunisian full stitch (insert hook in space between vertical bars and draw up loop)
y/o = yarn over (increase made)
sl st = slip stitch
ch = chain

Special Stitch:
Bamboo stitch = y/o, tfs in each of next 2 spaces, pull last two loops on hook back through y/o, at the same time.  For a video tutorial on Bamboo stitch, click here.

Notes:
  • Any yarn/hook combination can be used with this pattern.
  • All return rows are as normal: ch 1 for first stitch, y/o and pull through 2 loops for all subsequent stitches
  • All stitches are created knitwise, meaning the hook is inserted from front to back, through the fabric.
  • This pattern can be made in 2 colors, as shown, or using one color throughout.
  • Pictured hat is made extra long for slouchy look, but can also be worn with a fold-up brim. Note that the bamboo stitch is not very stretchy. It is recommended that a test swatch be done in desired yarn.
Pattern:

Ch 75 (or any odd number of stitches, enough to loosely fit around your head). Join with a sl st to first ch. Do not twist chain.
Row 1: Pull up loop in the back hump of each ch around.
Row 2: Work bamboo stitch pattern

Repeat Row 2 until desired length is reached. Hat pictured is 9” tall.

Finishing:

Pull the last CC stitch through final forward pass stitch. Cut both yarns, leaving about a 10” tail of CC. Thread CC through tapestry needle, weave in and out of the topmost stitches, pull tight to gather the top of the hat, and secure the yarn. Weave in ends.

Special thanks to Chaitanya Muralidhara for her technical editing expertise!


Sunday, July 10, 2011

Seaming Tunisian knit stitch and a free pattern!


I've been a bit obsessed lately with ways to seam Tunisian crochet, without the obvious seam! What about pieces that need to be seamed and can't be worked in the round? Or, how about those who are just getting into Tunisian crochet and don't have double-ended hooks yet? Or, how about those kick-ass yarns that can't really show off their stripes when worked in the round? Or, how about crocheters who just don't have a long enough cable to attempt the "circular" version of Tunisian? Or large pieces seamed together Aran style?

Let's face it. Some things are just going to need seaming. So, as I continue to obsess over this for other stitches, let me just share my seaming solution for pieces worked in Tunisian knit stitch. It's called the mattress stitch, and it's used in knitting. I've heard vague mention of it being used for this, but I was surprised to find my Google searches of Tunisian crochet + mattress stitch came up totally empty! And only the briefest of mention on Ravelry (oh, the shock!).

Before I learned to knit on circular needles, I knitted flat pieces that would have to be seamed together (i.e. into a hat). Since Tunisian knit looks so much like stockinette, I thought I would give it a try. Et voila! It works! Of course, how I do it is just a version of the mattress stitch, but it's adapted to Tunisian knit and I must say, the seam is almost invisible. Not perfect, but pretty damn good! Another surprise was that the inside of the seam was absolutely smooth, so you could even use this technique to make chemo hats!

Anyway, here is a basic knit stitch hat pattern, and two videos on mattress stitch seaming - one for pieces made in one color, and the other for pieces with color changes every other row. Enjoy!

Basic Tks Hat

Materials:
less than 100 yds each of 2 colors sportweight
J hook with cable attached
tapestry needle

Notes:
Although I used 2 colors, the possibilities are endless. Also, you can use any yarn you want. Just note that your decreases will be different than the ones mentioned in this pattern. If you aren't sure how to decrease, just send me a comment and I will help you out!

Terms:
tks = Tunisian knit stitch

Pattern:
With color A, ch 75
Row 1: with one loop on hook, pick up each st across. Return row as normal (and for all rows until the decreases). Before pulling hook through last stitch, drop color A, yarn over and complete stitch with color B.
Row 2: with one loop on hook, tks across the row. Change color on last stitch of return row.
Rows 3 and on: continue knitting across, changing color each row, until piece reaches desired length. I stopped when my piece reached about 8" tall as I wanted a slouchy hat.

Decrease Row 1: tks each st across. On the return row, y/o and pull through one loop, y/o and pull through 2 two times, y/o and pull through 3, *y/o and pull through 2 three times, y/o and pull through 3.* Repeat from * to * to end of row.

Row 1a: tks across with other color, sliding hook through both stitches that were decreased in the previous return row. This will ensure that they remain decreased stitches.

Decrease Row 2: tks each st across. On the return row, y/o and pull through one loop, y/o and pull through 2, y/o and pull through 3, *y/o and pull through 2 two times, y/o and pull through 3.* Repeat from * to * to end of row.

Row 2a: tks across with other color, sliding hook through both stitches that were decreased in the previous return row. This will ensure that they remain decreased stitches.

Decrease Row 3: tks each st across. On the return row, y/o and pull through one loop, y/o and pull through 3, *y/o and pull through 2, y/o and pull through 3.* Repeat from * to * to end of row.

Row 3a: tks across with other color, sliding hook through both stitches that were decreased in the previous return row. This will ensure that they remain decreased stitches.

Decrease Row 4: tks each st across. On the return row, *y/o and pull through 3.* Repeat from * to * to end of row.

Row 4a: tks across with other color, sliding hook through both stitches that were decreased in the previous return row. This will ensure that they remain decreased stitches. Do not change color on the last stitch. At this point, you should have 15 stitches. Cut yarn, leaving a very long tail of the color you just used.

Finishing:
Thread the yarn through your tapestry needle. Insert needle on the left side of your work, through the last row just made. Slide needle through each stitch and pull snug. The top of your hat should be gathered now.

Turn work with right sides together and use the mattress stitch to seam together. After seaming, if you don't care for the curl created by the knit stitch, either block it into submission, or add a brim of some sort. Totally up to you!

By the way, I wrote this up on the fly and haven't really proofread it. If you find mistakes, my apologies! Let me know and I will fix it right away. :)


Friday, July 8, 2011

A Funny Thing Happened...

**Errata added 7/9** - Trim should read *Dc next st, ch 7, sc in 5th ch from hook, ch 2, sk 3 st, dc next st.*

The other day, a nice gal named Les sent up a challenge on Ravelry to recreate Doris Chan's famous All Shawl in Tunisian crochet. Well, I love Doris, I love shawls, and I think everyone knows I love Tunisian! So, that challenge was right up my alley.

I knew I needed something semi-circular, and something with a fairly tall, open stitch. After all, these are the traits carried by the All Shawl. So, following the basic formula for a perfect (half) circle, I set off using the Tunisian double crochet, also called Tunisian double stitch but...

A Funny Thing Happened...

Take a look at this picture of the shawl, before blocking. There is a definite sway to the right. Convinced I had screwed up somehow, somewhere, I started designing a new shawl, also semi-circular, but with a more complicated stitch pattern. Sure enough, the sway was there too! I am not sure why it's there; it doesn't really show up as much when working other shapes. But, I am convinced that blocking cures all evils, and it didn't fail me on this adventure either. Anyway, hope you enjoy this pattern!

Materials:
GypsyKnits BFL Superwash Wool Fingering weight, appx 385 yds
J Tunisian (afghan) hook
Tapestry needle

Gauge: not especially important.

Abbreviations:

tds = Tunisian double stitch (y/o, insert hk, draw up lp, y/o, draw through 2 lps)
y/o = yarn over (increase made)
lp = loop
hk = hook
sp = space
st = stitch
ch = chain

Notes:

•Ch 1 at the beginning of each row, counts as a tds.
•All return rows are as normal: y/o, pull through 1 loop, then y/o and pull through 2 loops for remainder of row.
•Yarn-overs, and the spaces created by them, count as stitches and should be worked accordingly.
•All stitches are created knitwise, meaning the hook is inserted from front to back, through the fabric.
•The fabric will not appear to be perfectly semi-circular. However, a good blocking will remedy the situation regardless of the fiber content used.

Pattern:

**Read Notes first!**
Ch 10
Row 1: With 1 lp on hk, *y/o, pull up next loop*. Repeat from * to * to end of row.
Row 2: With 1 lp on hk, tdc in y/o sp, *y/o, tdc in next st and y/o sp *. Repeat from * to * to end of row.
Row 3: With 1 lp on hk, tdc in next st and y/o sp, *y/o, tdc in next 2 st and y/o sp *. Repeat from * to * to end of row.
Row 4: With 1 lp on hk, tdc in next 2 st and y/o sp, *y/o, tdc in next 3 st and y/o sp *. Repeat from * to * to end of row.
Rows 5 – to desired size: continue increasing each section by tdc in each tdc, as well as each y/o sp.

Trim/Bind Off Row:

Ch 10, sc in 5th ch from hook (counts as dc, ch 2), ch 2, sk 3 st, dc next st. *Dc next st, ch 7, sc in 5th ch from hook, sk 3 st, dc next st.* Repeat from * to * to end of row. In the event that you are short or over 1 extra st, just sk 2 st for last trim section, or sk 2 for the last 2 sections, to even it out.

Finishing:

Block the shawl, regardless of the material used, to beat the sway into submission. Check out the pics here on the blocking board, and after. Blocking matters!


Friday, April 22, 2011

Tunisian twisted knit stitch

Oh, and just for fun, and because it's a stitch I am working on in one of my new designs, here is a video tutorial on the Tunisian Twisted Knit Stitch (ttks)...

Left side increases in Tunisian crochet

So, I know I've been away for awhile, but it's been for good reason. Very good reason, actually. Awhile ago I was bitten by the design bug and since then it's been unstoppable. Obsessive really; it wakes me at night. I've been designing up a storm and have now submitted 4 designs to magazines with another 3 in the works at the moment. Now I know that none of them may ever actually get published, but I've got a pretty good feeling about them. And hey, I am getting out there. I am doing what I love. All the best designers started somewhere, right?

Anyway, during a design I was working on I came across a problem where I needed to increase the number of stitches but only on the left side. I am working in Tunisian crochet which presents some challenges. The right side increase is simple: chain the number of stitches you need, pick up the loops and keep on truckin'. Middle of the row increases are simple too - just place extra stitches between the posts (or something similar) in the appropriate places until the needed stitches are obtained. The left side is a horse of a different color. A fellow Raveler pointed me to a video from KnitDenise showing a left side increase using the Simple Cast On method, aka backwards E loop. A posting on Vashti Braha's blog noted the same technique. I tried it and was not pleased with my results. The bottom of the loops were too flimsy and loose for me, and didn't provide a clean edge. Of course, I have the same problem knitting into a Simple Cast On as well, so I should have guessed that crocheting into it would be no different for me. I needed the clean edge because I will be crocheting a trim onto it.

What's my solution then? Crochet Cast On! I used another hook to do a Crochet Cast On for one less than the number of extra stitches I needed. I took the last loop still on the extra hook and set it on my afghan hook. Voila! I had all the new stitches I needed, with a nice clean edge to come back and crochet over. I was so pleased I just needed to share!

Hope you find this helpful!

Wednesday, February 9, 2011

Experiment in blocking acrylic

So, if you've looked at any of my patterns (seriously, ANY of them), you will note that I use acrylic yarns for everything. Absolutely everything. Hubby and daughter are allergic to wool and my sons have sensitive skin. Did I mention I have three kids? Everything I own needs to be wash and wear. I do own an iron but it lives in the garage next to my sewing machine for the few times I need to iron fabric before tracing and cutting patterns. Other than that, I don't believe in high maintenance wearables. Hence my love of acrylic.

This weekend I am heading to Las Vegas and I wanted to have a couple of kick-ass crocheted pieces to take along. I chose the Toshiko Popover and the All Shawl, both Doris Chan creations. I made the Popover in naturallycaron.com Spa, and the All Shawl in Red Heart Soft. They are rockin'! The All Shawl, though, is waaaay too short for my liking. I even added two extra rows but the inevitability is staring me in the face: I am going to have to block it.

Um, I've never blocked a thing in my life. Working with acrylic, I don't really find the need. Plus, it scares me. But this shawl is a thing of beauty and I am all about new challenges, so why not give it a go? Did a bit of research and it seems peoples views on blocking acrylic are all over the map. Wet block, steam block, don't block. What's a gal to think? This is when the science geek in me takes over. On to my experiment...

I made three swatches in Red Heart Soft. I used edc (extended double crochet) since that's the stitch used in the All Shawl. I made them 4"X4". One was a control swatch, and would remain in its original state throughout the experiment. One swatch was to be wet blocked, and one was to be steam blocked. I don't have blocking boards or push pins, so I made do with what I have. I used plastic canvas sheets and sewing pins. Seems to have worked just fine!

All three swatches...
Photobucket

Sizing...
Photobucket


Wet Blocking
For this swatch, I just soaked the swatch and rung out the water as much as possible. Then I pinned in place and waited. It took 5 hours to dry!

Wet blocking on the plastic canvas...
Photobucket


Steam Blocking
For this swatch, I pinned in place and held my iron about 1 - 2" above the swatch. I kept blasting it with steam for about 2 or 3 minutes then left it to cool...which didn't take long.

Steam blocking on the plastic canvas...
Photobucket


After blocking, both swatches were the same size, as expected.

All three swatches ready for the washer...
Photobucket

But remember, this household is all about the washable benefits of acrylic. So, which method would retain its shape after being thrown in the washer/dryer? The results are quite clear. Although the steam blocked piece lost a bit of height, it's the obvious winner. In fact, I couldn't tell which swatch was original and which was wet blocked. Should have put a little contrasting yarn on that one too, but it really wouldn't have helped, since it ended up the same size as the original.

All three swatches, post washer/dryer...
Photobucket


Hope you enjoyed the results of my experiment as much as I did. Guess a handheld steamer is in my future as I REALLY need to block my shawl. Once I do, I will add pics!

Friday, December 31, 2010

Before 2011 gets here, it's time to clean house

So, I've been thinking a lot about 2011. What I want to make, what I want to accomplish, where I want to take my craft(s). I've got lots of plans! I am going to be the crochet instructor for two Michaels stores in my area. I am going to submit as many designs as I can to magazines in hopes that I actually get one published (at which point I would probably die of a heart attack - LOL), I am getting certified through the CYCA, I am going to really dive into knitting...oh, and at some point I will spend some time with my hubby and kids too. I suppose they would appreciate some attention now and then.

Whew! That's a lot. But before I could tackle the new year I had to do a little housekeeping first. No, I don't mean sweeping the floor and doing the dishes. (Well, OK, I do have some dishes that need attending now that I think of it.) I am talking about scraps. You know what I mean. We all have 'em. Drawers or bags or stashes of nothing but scraps. 10 yds here, 50 yds there...all remnants of our past genius. I just couldn't begin the new year with so many scraps leering at me, taunting me, telling me how many other beautiful yarns could fit in their place if only they were gone.

So what should I do with all those scraps? Make a blanket? Well, blankets aren't really my thing. I mean, I could make a massive one, and who knows? Maybe I will make one and donate the result to the Long Beach Rescue Mission (it's a homeless shelter and my dad is on the board of directors). Hmm...that sounds like a good idea. Why didn't I think of that first? In fact, maybe I will do just that since I still have sooo many scraps left.

In the mean time though, I have come up with something great! At least I am happy with it. :) Presenting - my Scraptastic Poncho! I used my own pattern, adapted to adult size, and all scraps from my scrap bin. About 85% worsted weight with a few sport weight and bulkys thrown in for fun. No two rows are the same yarn color. Same yarns in some cases, but not the same color. No black, no white. And all but 2 rows are either 100% acrylic or a blend thereof. So many colors, so many textures, and yet I think they all blend together to look great! I will probably add more rows as time goes by because it was a very addictive project. ;)

Here is a Before photo of my Scrap bin...
Photobucket

Here are the yarns I used, all lined up according to how much yardage I had and which colors/textures I liked next to each other...
Photobucket

And here she is! I just love how it turned out!
Photobucket

Close up...
Photobucket

Wednesday, November 17, 2010

Surface Braid Hat - free pattern!

ETA 11/18/2010: Thanks to a comment from Sirdar (am I to believe that's actually a representative of Sirdar yarn fame? - how cool!!), this stitch has a name! Well, a couple of names it turns out. And it's been around for ages! Also known as Camel Crochet (tm?), the Hump stitch, and a couple of other titles that aren't really used. This stitch is so cool, no matter what it's called. I am surprised it isn't more mainstream. Hopefully, with the pattern now having a presence on Ravelry, Crochet Pattern Central and Crochetville, this neat stitch will become more popular. Can't wait to see what others do with it! Thanks Sirdar!

Now back to the regularly scheduled program...

I guess it's been awhile, eh? I've been busy. Really, really, really busy (as my 2 year old would say). I am working on my first ever graded (sized) wearable pattern, and it's so fun! But also lots of work. Anyway, to take a little break from the grind, I came up with this new hat pattern. Hope you all enjoy! It was a surprise and an accident how I came upon this stitch technique. I know I didn't invent it, but after hours of scouring the internet, I can tell you almost NO ONE is using it. Hopefully this free pattern will excite others on it and we will start to see it used more. It's incredibly stretchy and would make a great chemo cap. (Hint, hint! My fav chemo cap group is Knots Of Love. If you can, make a hat for them!)

Surface Braid hat


Materials:
I or J hook - I crochet tightly and used a J, but the hat is so stretchy that you will probably want to use an I hook for more form-fitting results
ww/aran yarn (probably about 100 yds, but I forgot to weigh it. sorry!)
stitch marker (optional but recommended)

Notes:
This hat is worked seamlessly. Do not join rounds. Use stitch markers if necessary to identify the first stitch in each round. All stitches, after first round, are made into the back spine of the stitch (see video for clear instruction). And, this hat is reversible; either side makes for a great looking hat!

Special stitch:
See video for special stitch technique! (or see bottom of post for written instructions!)


Pattern:
Round 1: Ch 3, 12 hdc in 3rd ch from hook. (12 hdc)
Round 2: 2hdc in of each st around. (24 hdc)
Round 3: 2hdc in first st, hdc next st. *2hdc, hdc. Repeat from * to end. (36 hdc)
Round 4: 2hdc in first st, hdc next 2 st. *2hdc, hdc 2. Repeat from * to end. (48 hdc)
Round 5: 2hdc in first st, hdc next 3 st. *2hdc, hdc 3. Repeat from * to end. (60hdc)
Round 6: 2hdc in first st, hdc next 4 st. *2hdc, hdc 4. Repeat from * to end. (72 hdc)
Round 7: hdc in each hdc around.
Rounds 8 – end: Repeat Round 7 until desired length (between 7 – 8” for adult)
If making a child’s hat, eliminate Round 6 and Repeat Round 7 until the hat reaches between 6 – 7” tall.

Close up of the stitch definition...you can really see the braided feature sitting on the top of the hat.


And, like so many great things, this hat looks just as interesting when turned inside out!


UPDATE:

For those who are unable to view the video, I am so sorry that I didn't write out the instructions. Silly me! Anyway, here goes...

Create a hdc as normal EXCEPT instead of inserting the hook under the front and/or back loops, turn your work towards you slightly and find the horizontal bar just below the top loops. Insert your hook under that bar, and complete the hdc as normal. This pushes the front and back top loops to the front of your work, showcasing the neat braid effect!

Monday, September 27, 2010

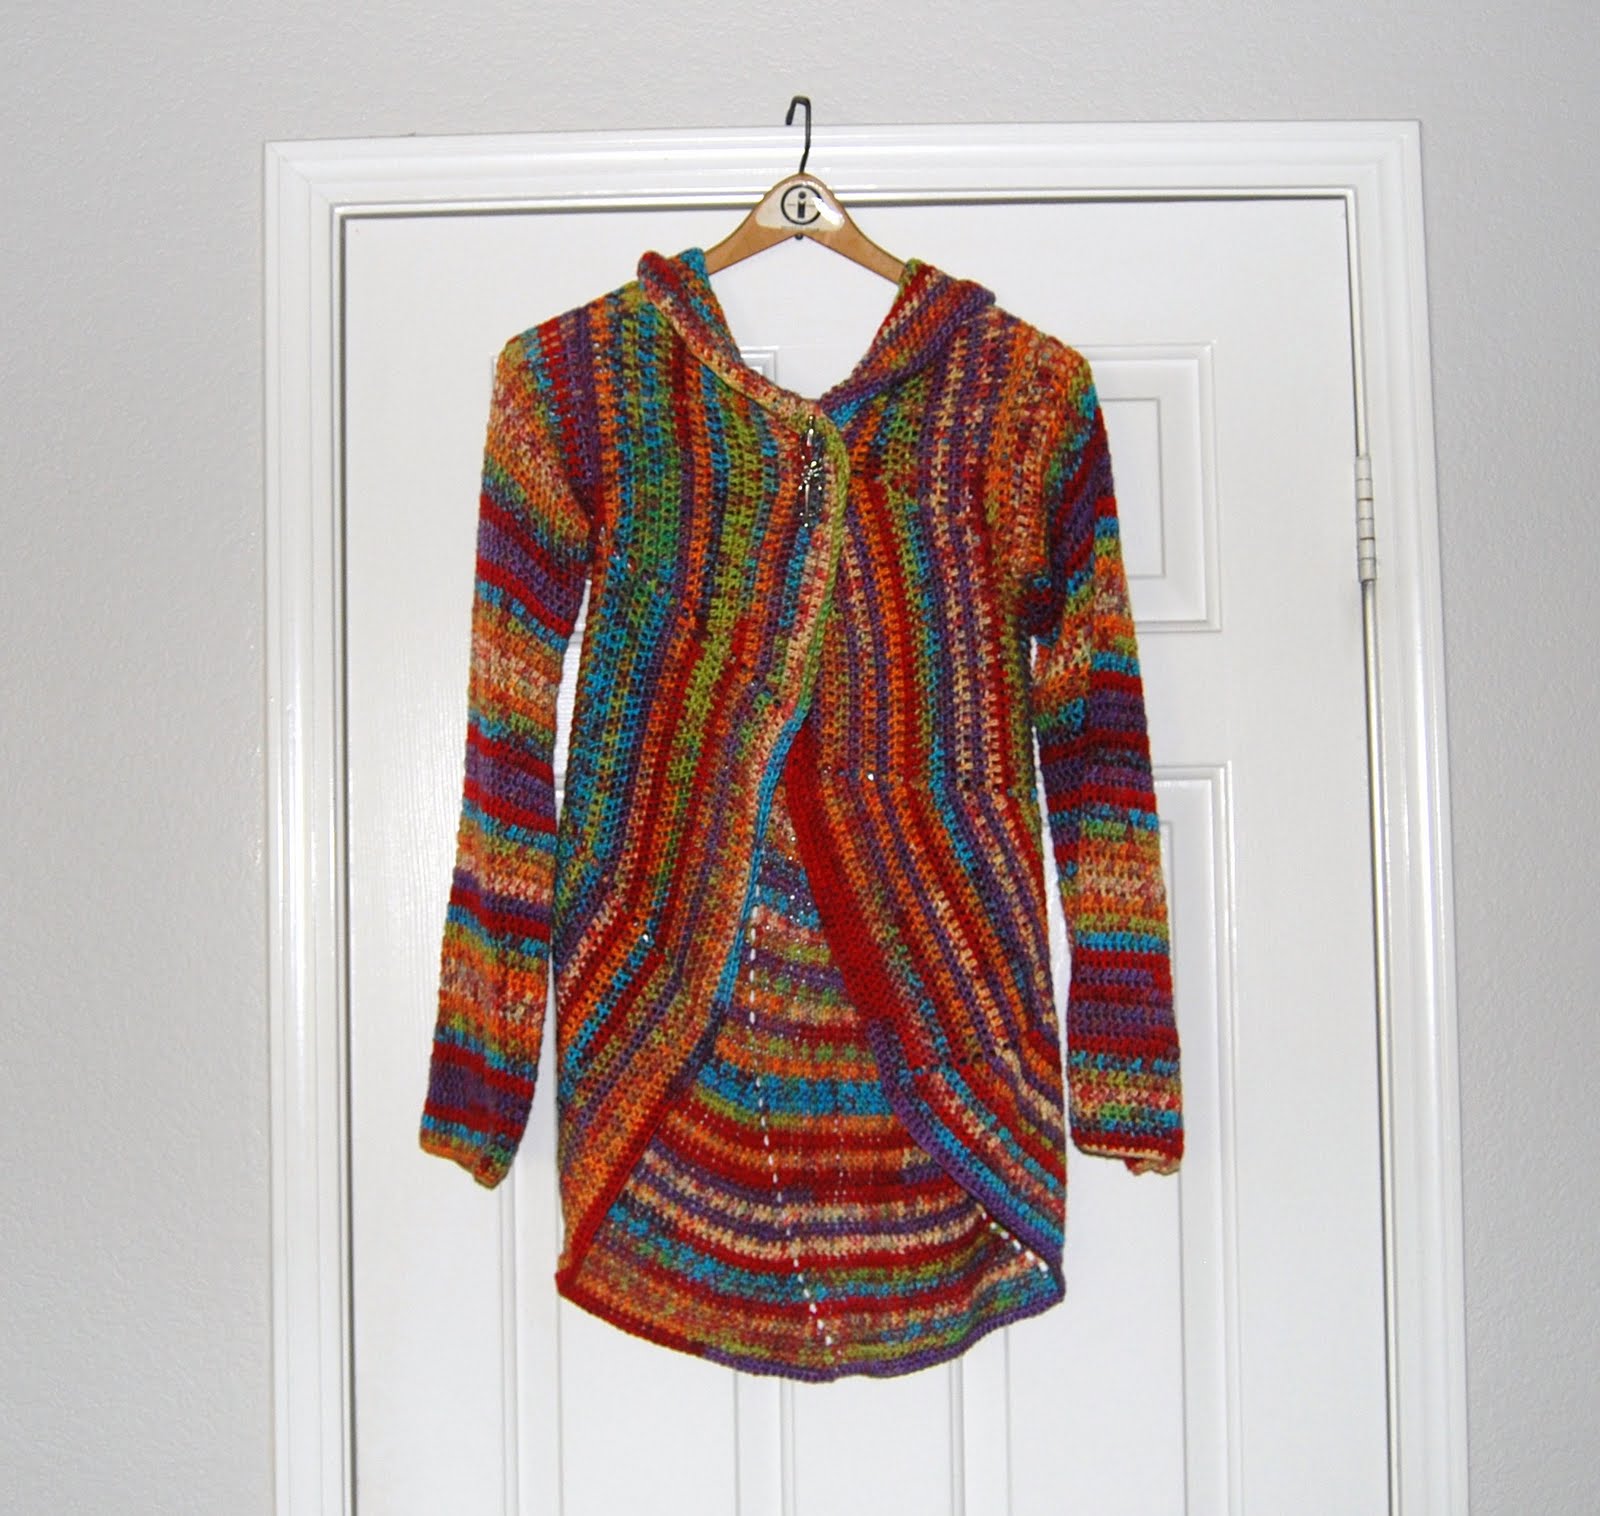
My version of the pinwheel sweater


So, I saw this amazing circle sweater, but alas, it's knitted. Although I've recently learned to knit, I am nowhere near ready for that sweater, or the amount of time it would take to complete said sweater! So, why not make one for myself. I mean, really, it's just a giant circle. Anyway, thought I would share with you all how I made it. Therefore, this isn't really a pattern so much as it is a tutorial. And because of the nature of this pattern, it can be altered to fit a child too.


Pinwheel Sweater


I used about 7 skeins of Premier Yarns Deborah Norville Serenity Garden in Gems colorway. The package says it's a fine weight yarn, other sources list it as sport weight. I think it's somewhere in between.

H hook

Fdc (foundation double crochet) - here is a link to an excellent video tutorial.
Body

Note: All stitches are made in dc, so always sk ch 1 sp, unless otherwise noted. Sl st to top of ch 3 to join each round.

Ch 4, 11 dc in 4th ch fr hk (12 dc)
Ch 4 (counts as dc and ch 1), *dc, ch 1 in next dc*. Repeat from * to * to end. (12 dc, 12 ch 1)
Ch 3, dc in same st, ch 1, *2dc, ch 1 in next dc.* Repeat from * to * to end. (24 dc, 12 ch 1)
Ch 3, dc in same st, dc, ch 1, *2dc, dc, ch 1.* Repeat from * to * to end. (36 dc, 12 ch 1)
Ch 3, dc in same st, dc, dc, ch 1, *2dc, dc, dc, ch 1.* Repeat from * to * to end. (48 dc, 12 ch 1)
Ch 3, dc in same st, dc, dc, dc ch 1, *2dc, dc, dc, dc, ch 1.* Repeat from * to * to end. (60 dc, 12 ch 1)

Continue increasing as in pattern above until circle reaches diameter of the distance between the outer edges of your shoulders. For example, mine was 17".  If in doubt, add a little room.  You don't want it to be too tight!  Now you are going to make the holes for the sleeves.

Continue in pattern until first ch 1. Ch 1, then fdc number of stitches required and reattach at next set of increases by dcing into the first of the two dcs. To make that a bit simpler, let me give you my example. When I made my sleeves, I had 19 st between ch 1 spaces. So, I fdc 19 st and reattached with 2 dc in the next set. Continue as before for the next 7 sets. Ch 1, and fdc number required again and reattach as before. Continue pattern and sl st to join the round.

At this point, lay the circle out flat. The distinct pinwheel pattern has 12 sets or sections. There should be 3 sections between the armholes at the top, and there should be 7 sections between the armholes at the bottom. Also at this time, you should try it on to make sure there is enough room between the shoulders and to make sure the armholes are large enough.

Continue in pattern until you can put on the sweater and the fronts easily overlap each other, or until you like it. You may find a point where it gets too long in the back for your liking. Just stop there! No rhyme or reason, just make it until you are satisfied.

Here's what it should look like before attaching the sleeves.


Arms


Notes:
There will be no increases made in the sleeves or they will be way too big! Also, you will not be joining the rounds. Count the number of stitches around and divide by 2; this will be your halfway number.

At the point where the fdc joins the sweater, join the yarn and ch 3. Dc next stitch. Continue dc until you reach your halfway number, ch 1, sk 1. Continue with your second half, dcing in each st as you go, until the end. Ch 1, sk 1. Dc in second dc (skipping ch 3 from previous round) and across until you reach ch 1 sp. Dc in ch 1 sp, ch 1, sk 1. *Dc around until ch 1 sp, dc in ch 1 sp, ch 1, sk 1* Repeat from * until you reach the desired length. Try on regularly to make sure of fit.

Now, the very nature of this sweater means that it will just fall right off without some sort of closure device. I use a hairpin as a shawl pin, but any shawl pin will do.

Here is a pic of the front where you can kinda see my hair pin closure.


I hope I made this clear enough! Enjoy!

Friday, September 24, 2010

Charisma hat - free pattern!


I am obviously into the chunky weight yarn thing today because I have another free pattern I would like to share! I can't be the only person to have come up with something like this, so I apologize to everyone else out there who thinks like me. I really do. No one should think like me. It's not...normal.

Moving on...don't you love my son's face in this pic? He was irritated that I was using him as a head model for what he called a "chick's hat." I asked him if he would still feel that way if it were in a different color. He said he would wear it if it were black, grey, red or something other than stripes. LOL! Well, there you go. A guy's point of view...from an 11 year old.

Charisma

Materials:
Approx. 3 oz bulky weight yarn
N hook

Time needed: 1 - 2 hours, tops. Works great as a last minute gift for that friend that just told you this morning she is stopping by and you missed her birthday last month, and, come to think of it, last year.

Notes: although I used self-striping yarn (which is undoubtedly uber-cool), any smooth solid color yarn will work well too.

Notes 2: I named this scarf Charisma because that's the yarn I used. I used the self-striping version called Sunny Day. It was my first time with it, and I must say, I really liked it!

Notes 3: Join each round with a sl st to first st made.

Directions:

Ch 4, sl st to first ch to create ring
Round 1: ch 1, *sc in ring, dc in ring* Repeat from * to * 3 more times. (8 st)
Round 2: ch 3, (counts as dc from here out), sc in same sp made as join. (Dc, sc) in next st and in each st around. (16 st)
Round 3: ch 1, *(Sc, dc), sc, (dc, sc), dc* Repeat from * to *, to end. (24 st)
Round 4: ch 3, sc in same sp made as join, dc next, sc. *(dc, sc), dc, sc* Repeat from * to * to end. (32 st)
Round 5: ch 1, *(Sc, dc), sc, dc, sc (dc, sc), dc, sc, dc* Repeat from * to *, to end. (40 st)
Round 6: ch 3, sc in same sp made as join, dc next, sc, dc, sc. *(dc, sc), dc, sc, dc, sc* Repeat from * to * to end. (48 st)
Round 7: ch 1, sc same sp made as join, dc next. *Sc, dc* Repeat from * to * to end. (48 st)
Round 8: ch 3, sc next st. *Dc, sc* Repeat from * to * to end. (48 st)
Round 9 - desired length. Note that in Rounds 7 and 8, all sc should be made in dc stitches and all dc should be made in sc stitches.
Ch 1, reverse sc around hat, if desired. F/O, weave in the ends, and you are DONE!

One skein Tunisian scarf


So, if you are anything like me, you lurve the feel of Homespun yarn but hate actually crocheting with it. Maybe it's just me, but I have the hardest time seeing my stitches using this yarn, and I am constantly splitting it with the hook. So beautiful, so soft, so evil.

Anyway, for me, Tunisian crochet is the answer! Using this technique allows me to use this lovely yarn for good and not firepit kindling. And, like most fiber addicts, I bet you have a skein (or 8) of this torturous yarn laying about, without purpose, without future prospects. And, like most, you hate the notion of tossing out perfectly good yarn. Well, let me solve that for ya! This scarf pattern doesn't curl, has really nice drape and is very warm and soft. And on top of all that, it's washable! Yay!

One Skein Tunisian Scarf

Materials:
Bulky weight yarn - yep, you guessed it, one skein Homespun
9 mm afghan hook

Time needed: about 3 hours, more or less, depending on the number of children you have running about screaming that they want juice, are fighting with their siblings, just dropped a paint can on the floor...oh, I digress...

Notes: all return rows are done as normal - y/o, pull through one for the first stitch, y/o pull through two for the remaining stitches in the row.

Stitches used:
Tss - Tunisian simple stitch Slide hook from right to left under the post of the stitch and draw up a loop.
Tdc - Tunisian double crochet. Y/o, slide hook from right to left under the post of the stitch, draw up a loop, y/o and pull through 2.
Sc - single crochet. Um, I bet you know this one already. :)

Directions:
Ch 15
Row 1: with one loop on, tss across the chain, return row
Row 2: ch 2 (counts as first tdc), tdc across the row, return row
Row 3 - : repeat Rows 1 and 2, until you reach the desired length, or until you reach the end of the skein.
Bind off using sc.

There, couldn't be simpler. :)

Friday, September 3, 2010

Mini Rib Hat - free pattern!

1/17/2011 ETA: many have asked about how wavy this pattern is when starting out. Keep with it! I promise, after several rounds, it will take shape!

To celebrate my Adventures in Knitting, I thought I would share a free crochet pattern with you. Doesn't that sound like fun? Enjoy!

Here is my pattern for the Mini Rib Hat. Now there's nothing mini or ribbed about this hat, but the finished hat looks a bit ribbed, and I couldn't think of anything better to call it. It produces a dense weave so it's really warm, but is very stretchy because of the ch 1 sp throughout. This would make a great chemo cap for those of you out there who donate!

Mini-Rib hat

Materials Needed:
J hook
2.75 oz ww yarn (appx 140 yds)
Trace amount of contrast color
Stitch markers (optional but may be helpful with this pattern)


Note:
• V stitch – (sc, ch 1, sc) all in same st.
• Always sl st to first sc to join round.
• All V stitches made in ch 1 sp, unless otherwise indicated.

Pattern:
Round 1: Ch 2, 10 sc in 2nd ch from hk. (10 sc)
Round 2: Ch 1, V st in first sc, and in ea sc around. (10 V st)
Round 3: Ch 1, 2 V st in first ch 1 sp, V st next ch 1 sp. *2 V st in ch 1 sp, V st next ch 1 sp.* Repeat from * to end. (15 V st)
Round 4: Ch 1, 2 V st in first ch 1 sp, V st next ch 1 sp (2 times). *2 V st in ch 1 sp, V st next ch 1 sp (2 times).* Repeat from * to end. (20 V st)
Round 5: Ch 1, 2 V st in first ch 1 sp, V st next ch 1 sp (3 times). *2 V st in ch 1 sp, V st next ch 1 sp (3 times).* Repeat from * to end. (25 V st)
Round 6: Ch 1, 2 V st in first ch 1 sp, V st next ch 1 sp (4 times). *2 V st in ch 1 sp, V st next ch 1 sp (4 times).* Repeat from * to end. (30 V st)
Round 7: Ch 1, 2 V st in first ch 1 sp, V st next ch 1 sp (5 times). *2 V st in ch 1 sp, V st next ch 1 sp (5 times).* Repeat from * to end. (35 V st)
Rounds 8 – 26: Ch 1, V st in ea ch 1 sp around. (35 V st)
Round 27: Join contrast color, Ch 1, V st in ea ch 1 sp around. (35 V st)
Round 28: Pick up main color, Ch 1, V st in ea ch 1 sp around. (35 V st)

Cut yarn, fasten off and weave in the ends!

Sunday, August 1, 2010

Deeply Textured Hat free pattern, and other mutterings

Hello fellow bloggers! Anyone miss me? It's been 2.5 looooong months since I've posted here. Lots has happened, but of course, the biggest change has been moving into our new house. I just love it! And I really love this town. I have been working so hard on this house; painting, painting and more painting. All 1851 square feet of this house has been painted by me...14 ft ceilings and all! Quite proud of myself actually. I've only smudged paint onto the ceiling once or twice (per room)...

But let's not think it's been all work and no play for this lady. Oh no. I've been crocheting up a STORM! I promised my sweet hubby that I would blow through my stash before buying any more yarn, and until today, I've stuck to that promise. Do you know how hard it's been to refrain from random yarn purchases? I mean, really, the ads come out every Sunday and Wednesday, taunting me with the deals of the week. But I've resisted. Until today that is. However, I only bought one ball of yarn and I really NEEEEEEEEEDED it (for a project to be named at a further date). So that's not really breaking a promise, is it? LOL

I am still super into Tunisian crochet. In fact, I am putting the finishing touches on my very first "for sale" pattern! Just thought I would try my hand at it. Worst that can happen is no one likes it! LOL Anyway, it's a bag, well, two bags actually, and I am hoping to post it in the next day or two.

But for now, as a welcome back to me present (from the land of painters tape, rollers, and ah...crap, I spilled paint on the floor debacles) I am pleased to give everyone a free pattern! This is regular crochet, so no fear, ok?!


Deeply Textured Hat
heavy ww yarn (aran yarn)/ J hook
**Gauge is not particularly important as I think it should fit just about any adult. However, my gauge on this hat was 2 row heights = 1" **

Stitches to know - dc (double crochet), fptc (front post triple crochet). Click on the link if you are unsure about the fptc.

NOTE: sl st to join each round

Round 1: Ch 4, 11 dc into 4th ch from hook (12 dc)
R2: Ch 3 (counts as dc from here out), dc into same st, 2 dc into next st and each st around. (24 dc)
R3: Repeat R2 (48 dc)
R4: Ch 3, dc into same st, dc next 3 st. *2 dc next st, dc next 3 st* Repeat from * to end. (60 dc)
R5: Ch 3, fptc around same st, *dc next st, fptc next st* Repeat from * to end. (30 dc, 30 fptc). After joining the round, sl st to the next st.
R6: Ch 3, fptc around first dc from previous round, *dc into fptc from previous round, fptc next* Repeat from * to end.
R7: Repeat R6 until you reach your desired length. Finish with one round sc in each st.

FYI: I have a total of 14 rows = 7".

Feel free to destash some of your scrap yarn by adding a stripe or two. On the gray version I created a whole round in the green, and one row sc. On the brown version, I just did the sc round in blue. I only had the tiniest bit of that blue in my stash, and now it's gone!

Another note - if you choose to use a lighter weight worsted yarn, you may want to increase your crown stitch count to 72, depending on how tightly you crochet.

Well, hope you enjoy! Can't wait to see how it turns out for everyone!

Friday, May 14, 2010

Ribbed Brim Tunisian Hat

Front and top views of two colorways of my latest creation...


I can't stop myself with this Tunisian thing...I just love it. I only have a few days before Moving Day, but who cares? I am lovin' my crochet. Anyway, here is another hat pattern. Reminder: I am no pro at writing patterns, so don't shoot me if there's something wrong! LOL!


OK - here goes...

Materials: two colors ww yarn, double-ended J (6.00mm) hook, tapestry needle

Chain 60 (small hat), 66 (medium hat) or 72 (large hat)

Pick up stitches around with primary color as in Tss. Keep turning hook back and forth as Tunisian in the round.

Turn hook and bind off as normal with secondary color.

Continue around for about 14 rows. Then, with all decreases happening on the forward pass, tss next 4 stitches, tss2tog next two stitches. See pic.

Continue for one round. Next round, tss next 3 stitches, tss2tog next two stitches. If it works out correctly, you should be tss2tog the stitch before and the decrease stitch from the previous round. See the picture since I am sure that made no sense whatsoever. The silver hook is pointing to the example. Sorry I used dark colors. LOL


Continue in the decrease pattern until only one or 2 stitches remain. Fasten off by pulling both colors through the last loop on hook. At this point, a small bit of the hat may be sticking up a little funny from the top. No biggie. Just tuck the loose ends back through the hat and weave in the ends nicely.

Now, join either color yarn to the original chain with a sl st. At this point, you can switch to a regular J hook, if you want. Chain 3 (counts as bpdc from here out), and dc in each ch around. 66 dc. Sl st to beginning ch 3.

Ch 3, fpdc next stitch, bpdc next stitch, and so on. You are creating the ribbing. Continue this around, sl st to first ch 3. Continue for 2 or three more rounds (depending on how long you want the hat) and then finish off.

Weave in ends neatly BECAUSE...this hat is also reversible! Tunisian "wrong side" is just as interesting as "right side" in my opinion. Just check out the reverse of these!


Well, I hope you enjoy this pattern! Please don't sell this pattern! Have fun!