
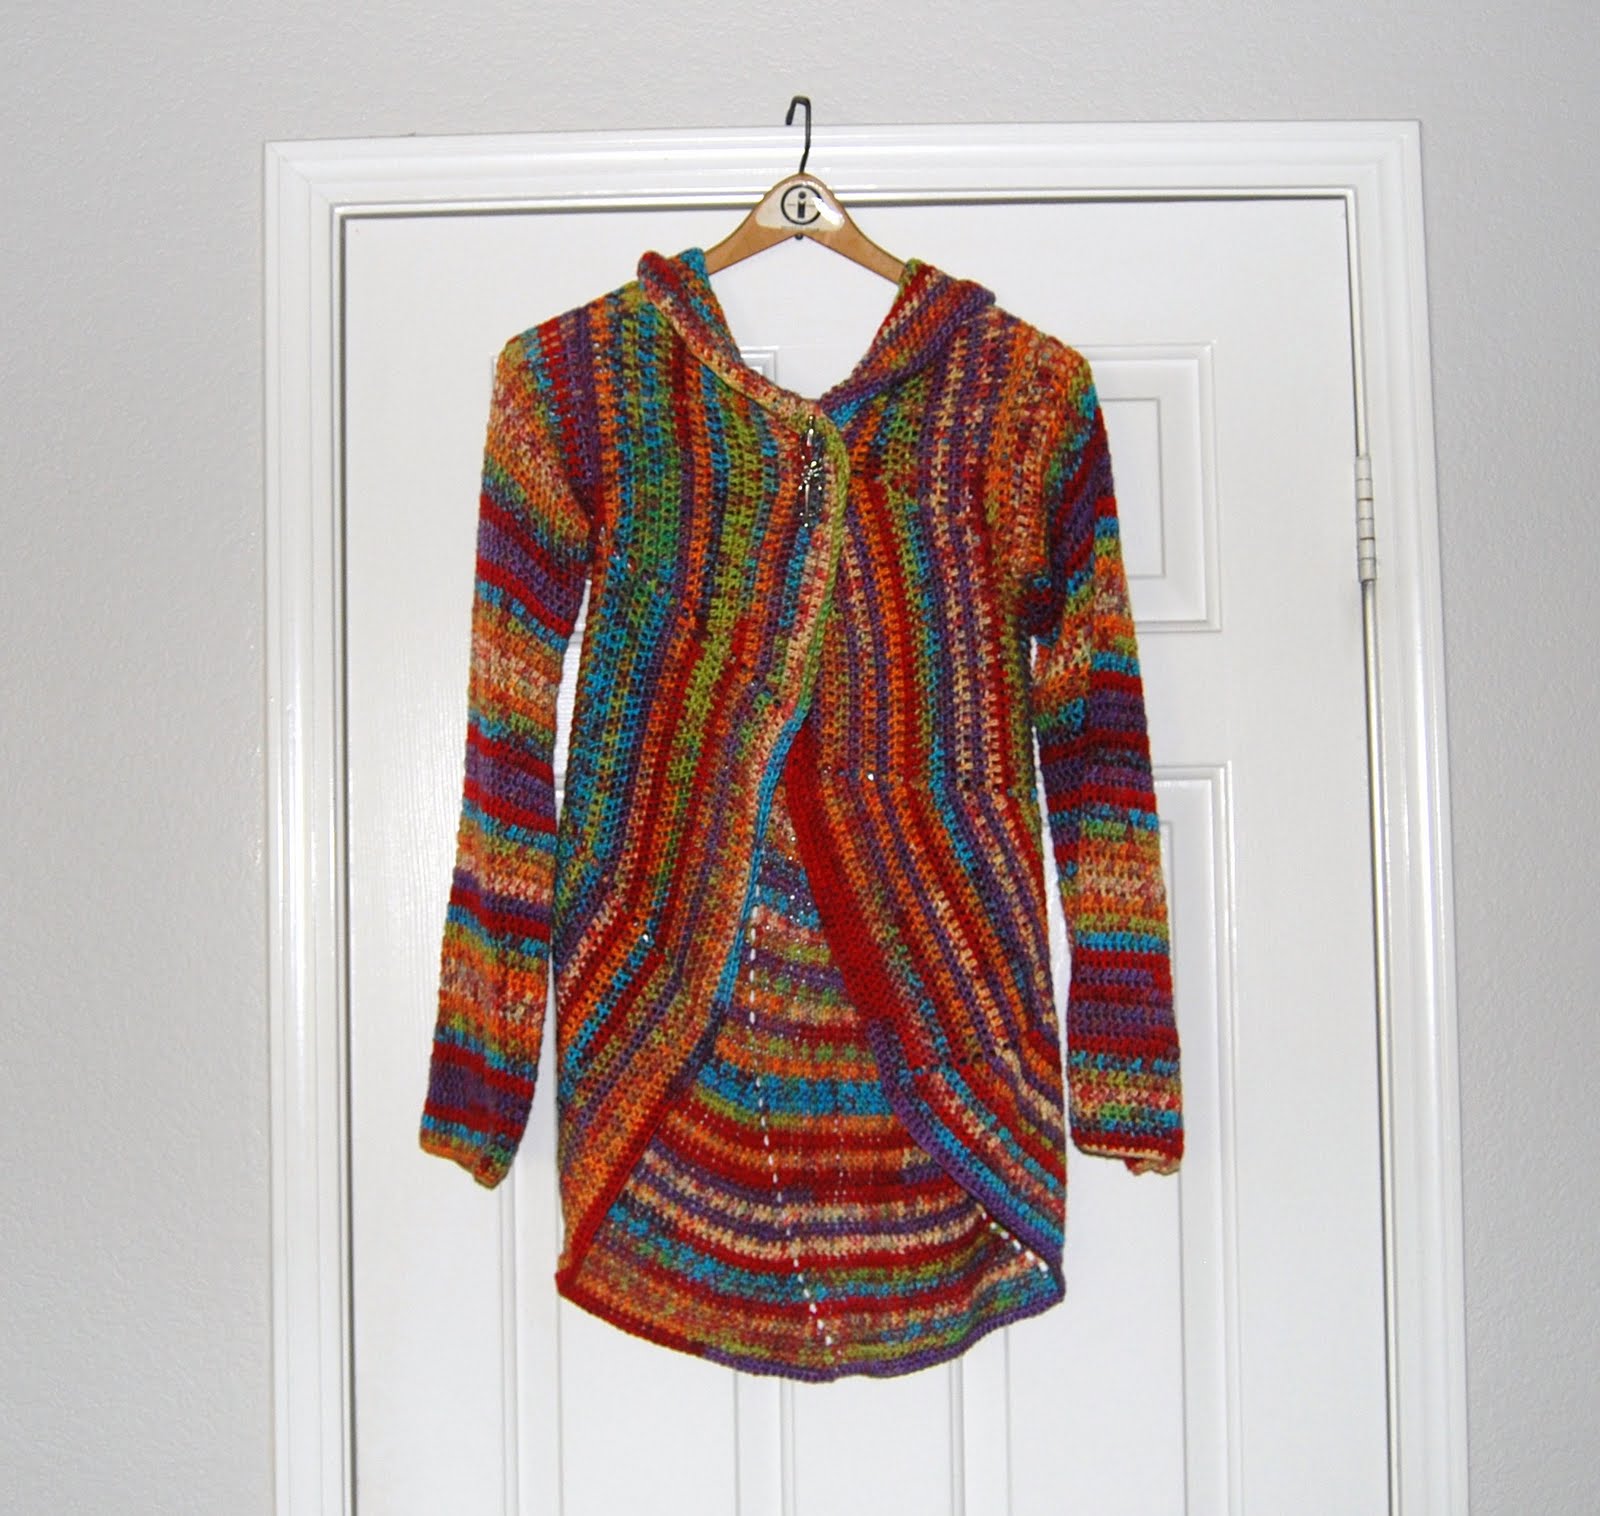
So, I saw this amazing circle sweater, but alas, it's knitted. Although I've recently learned to knit, I am nowhere near ready for that sweater, or the amount of time it would take to complete said sweater! So, why not make one for myself. I mean, really, it's just a giant circle. Anyway, thought I would share with you all how I made it. Therefore, this isn't really a pattern so much as it is a tutorial. And because of the nature of this pattern, it can be altered to fit a child too.
Pinwheel Sweater
I used about 7 skeins of Premier Yarns Deborah Norville Serenity Garden in Gems colorway. The package says it's a fine weight yarn, other sources list it as sport weight. I think it's somewhere in between.
H hook
Fdc (foundation double crochet) - here is a link to an excellent video tutorial.
Body
Note: All stitches are made in dc, so always sk ch 1 sp, unless otherwise noted. Sl st to top of ch 3 to join each round.
Ch 4, 11 dc in 4th ch fr hk (12 dc)
Ch 4 (counts as dc and ch 1), *dc, ch 1 in next dc*. Repeat from * to * to end. (12 dc, 12 ch 1)
Ch 3, dc in same st, ch 1, *2dc, ch 1 in next dc.* Repeat from * to * to end. (24 dc, 12 ch 1)
Ch 3, dc in same st, dc, ch 1, *2dc, dc, ch 1.* Repeat from * to * to end. (36 dc, 12 ch 1)
Ch 3, dc in same st, dc, dc, ch 1, *2dc, dc, dc, ch 1.* Repeat from * to * to end. (48 dc, 12 ch 1)
Ch 3, dc in same st, dc, dc, dc ch 1, *2dc, dc, dc, dc, ch 1.* Repeat from * to * to end. (60 dc, 12 ch 1)
Continue increasing as in pattern above until circle reaches diameter of the distance between the outer edges of your shoulders. For example, mine was 17". If in doubt, add a little room. You don't want it to be too tight! Now you are going to make the holes for the sleeves.
Continue in pattern until first ch 1. Ch 1, then fdc number of stitches required and reattach at next set of increases by dcing into the first of the two dcs. To make that a bit simpler, let me give you my example. When I made my sleeves, I had 19 st between ch 1 spaces. So, I fdc 19 st and reattached with 2 dc in the next set. Continue as before for the next 7 sets. Ch 1, and fdc number required again and reattach as before. Continue pattern and sl st to join the round.
At this point, lay the circle out flat. The distinct pinwheel pattern has 12 sets or sections. There should be 3 sections between the armholes at the top, and there should be 7 sections between the armholes at the bottom. Also at this time, you should try it on to make sure there is enough room between the shoulders and to make sure the armholes are large enough.
Continue in pattern until you can put on the sweater and the fronts easily overlap each other, or until you like it. You may find a point where it gets too long in the back for your liking. Just stop there! No rhyme or reason, just make it until you are satisfied.
Here's what it should look like before attaching the sleeves.

Arms
Notes:
There will be no increases made in the sleeves or they will be way too big! Also, you will not be joining the rounds. Count the number of stitches around and divide by 2; this will be your halfway number.
At the point where the fdc joins the sweater, join the yarn and ch 3. Dc next stitch. Continue dc until you reach your halfway number, ch 1, sk 1. Continue with your second half, dcing in each st as you go, until the end. Ch 1, sk 1. Dc in second dc (skipping ch 3 from previous round) and across until you reach ch 1 sp. Dc in ch 1 sp, ch 1, sk 1. *Dc around until ch 1 sp, dc in ch 1 sp, ch 1, sk 1* Repeat from * until you reach the desired length. Try on regularly to make sure of fit.
Now, the very nature of this sweater means that it will just fall right off without some sort of closure device. I use a hairpin as a shawl pin, but any shawl pin will do.
Here is a pic of the front where you can kinda see my hair pin closure.
I hope I made this clear enough! Enjoy!
This is really cool! I saw the original pattern on Ravelry, too, and thought it was really awesome. However, I crochet much faster than I knit, so I never cast on for the knitted version thinking I'd never finish it. Thanks for this tutorial/pattern!
ReplyDeletethanks so much for sharing the pattern how-to! Its beautiful!
ReplyDeleteI saw in Ravelry! It's a beauty!!! Thank you for share!!!
ReplyDeleteI'm having issues with the sleeve openings. I am not joining them correctly, I think. When I do the opening for the sleeve, it turns into almost adding another row, instead of an opening, then a continuation of the same row. Which would be fine, except it is happening on both sleeve openings, so I'm basically joining and jumping up a row twice on my way around. How did you do the join after the row of fdc?
ReplyDeleteto finish round, after creating dc, slip stitch into the third chain to finish round.
DeleteHey there! I sure hope I am understanding the problem. The sleeve opening is a continuation of the row you are already working on. However, the sleeve opening portion is done "in the air," if you will, rather than attached to the stitches below it. Once you have worked enough stitches "in the air" you then skip the required stitches below and reattach it to the sweater. Hope that helps!
ReplyDeleteHow about this: When I do the first fdc, so I start it by chaining four, then do the fdc, or do the fdc anchoring it to the bottom of the last dc? Is that clearer? Hard to describe without pics. I think this is what the issue is - I'm chaining 4 "on top" of that last dc, and it is essentially raising the fdc to the next row.
ReplyDeleteI think I get the problem now. Do the first fdc by anchoring it to the last dc (before starting the sleeve opening). That way it is a continuation of the row you are working on. Hope that helps!
ReplyDeleteHello...first I want to say this is a beautiful project and I'm very excited ABOUT MAKING MY OWN..I just have one question..are rounds worked in stitches or in spaces? Thank you
ReplyDeleteHi Rhythm - in the body of the sweater, all stitches are made in other stitches and all spaces are skipped. In the arms, because there is no increase happening, stitches will be made in other stitches, and also in the ch 1 space. However, right after you dc in the ch 1 sp, you will ch 1 and skip the next st so that the diagonal hole pattern continues.
ReplyDeleteHope this helps!
Is the diagonal hole necessary or can it be replaced with say an FPDC forming a diagonal ridge between the sections rather than a hole?
DeleteAaahh this is GORGEOUS! Thank you for sharing! I'm starting right away!
ReplyDeleteHow do you think this would be if I used worsted weight yarn?
ReplyDeletePat
I think it would work just fine with ww or even bulky weight yarn. Just keep in mind the total weight of the finished project. The formula for the sleeve opening would stay the same. Keep me posted if you try it in ww yarn!
ReplyDeleteI'd like it in ww
DeleteThanks for the gorgeous pattern. I made mine in the "Sea" color of the Deborah Norville yarn and it looks beautiful. I didn't like the way the edges curled after I made the body circle, so I added a quick fan stitch border. There was a chain stitch swirl right at the overlap in the front, so I sewed a button on and can now close the sweater without a shawl pin. I love my new sweater! Thanks again!!
ReplyDeletecraftygma, would you mind posting a picture of your sweater? Thanks!
ReplyDeleteMaria, I have pictures, but can't find a way to post them. They don't really show the border or the button, but you may get an idea of what I did if I could figure out how to get them up. Can any one help??
ReplyDeleteHey again Maria, I posted pics of my sweater at Crochetville, my screen name there is Sweetiesgirl. If you are a member there, you can see them in the Comments for Pinwheel Sweater. Thanks for your interest!
ReplyDeleteThis is a beautiful sweater! I am making one in black and white bulky yarn. This is my first clothing article (aside from hats and scarves). Thanks for the simple pattern. I will share my project on Ravelry. My SN is SlCline and my project is called Black and White Vortex Sweater. :D
ReplyDeleteI LOVE this pattern. I think its great that it can be made for any size person. Its so hard to find plus size patterns,but this works great! I shall be sporting LOTS of these this winter! Thanks so much!!!
ReplyDeleteThis is great! Like you, I've admired the knitted pinwheel pattern but wanted something I could hook as I'm much faster with one stick than two. I just wanted a pinwheel blanket for a baby gift, but now I have that plus a pattern for a cardigan. Woohoo! Thanks!
ReplyDeletewould this pattern work with a heavier weight yarn?
ReplyDeleteAbsolutely! I used Wool-Ease Chunky to make this sweater and it worked well too. :)
ReplyDeleteHello! I LOVE this pattern *I've been crocheting for about a year and I've learnt so much already from your directions...
ReplyDeletebut I was wondering, how did you make the hood!?
Actually, the "hood" is only the upper portion of the circle folded over. :)
DeleteThis comment has been removed by the author.
DeleteThank you so much for this amazing tutorial. I'm just finished up a sweater for my 2 year old daughter! I love how easy it is to make and to customize the sizing. I'll try to post a pic when it's completed!
ReplyDeleteI am a bit comfused about how to make the arm holes for this wonderful swerter. What is a FDC? and if it is what I think who exactly do I continue my swerter?
ReplyDeleteOnce you've reached the desired width in the back, you will make an armhole by fdc (foundation double crochet) the desired number of stitches to span the gap of the next slice of the pinwheel. You will reattach it, like a bridge, to the first stitch of the next slice of the pinwheel pie and then keep on stitching.
DeleteDoes that help?
I have to try this! OMG....love it. Wow! at your ability to see the adult version from the baby coat. Can't wait to start dc-ing to beat the band :-)
ReplyDeleteI hope you still check the comments on this sweater (or someone who has done it has). I have a question that will reveal that I'm "overthinking it" but I must ask. I have made this before after my friend shared the pattern with me. I did it with NO problems. But this time around (same piece of paper), I am not doing something right and the pattern isn't coming through. So...here are my questions:
ReplyDeleteWhen I get to the third row and it says "dc in same st" is when I get confused.
Do I sl st to join each round starting at the end of round 2 and 3 or rounds 3 and 4? I would think 3 and 4 based on the note. But then then how does line 2 get joined to 3.
Then, in round 3, what "same stitch"? Is it the stitch where the chains started in or the chain I connected to in the joining in the round. When I join them with the sl st, is in a join in the top chain or under the enter chain of 3. My memory says the whole chain. But then am I dc-ing in the chain?
I've tried this several ways and I'm ready to scream (mostly because I know I'm overthinking it since I did it before)! I just need to figure out the joining and increases and write it in on my sheet and I'll be fine.
More comically, I recently moved the sweater that I did before. But I can't remember where I put it now and I can't just look at it and see what I did.
If you are able to help, please, please, please, help the pathetically crochet-challenged.
You slip stitch to join every row, & then the chain 3 counts as the first DC for each row. Essentially every row gets joined by slip stitching into the top of the ch 3 you started the row with. Also crocheting into the same stitch is just a standard increase. 2 DC in the top of ch 3 from previous row. Hope this helps!
ReplyDeletei love this i am a very large person and wonder how this would look on me. i have a large stash of worsted weight yarn so my sweater would be more like a coat. i was thinking of following this idea and doing a bit of free styling too especally on sleeves. i giveaway most of what i make but this would be truely mine i guess if i dont like it i can always frog and create something else
ReplyDeletei want to make this but my problem is the yarn, can someone send me please....yarns are so expensive here
ReplyDeletewhats the meaning of sk,sl, st sp or the abbreviation , i will try this project...thanks in advance for your reply.
ReplyDeleteis there a video tut any where for the arm hole space? i think seeing it would really help me to see it i just dont get it! thanks :-)
ReplyDeleteI'm having the same problem. My experience is limited to afghans and hats so I cant figure out how/where to start my fdc. If I finish the row I'm working on then the fdc row is raised up as a new row. Is that correct?
DeleteNew to crocheting (one pair of boots to my name) but I am totally inspired by this tutorial - WOW! One day soon I will be wearing my own version of this!
ReplyDeleteWould love to post pics of mine it was a great success and my first ever sweater!!!
ReplyDeleteGorgeous! One of my projects for 2014. Will post pic. Thank you for sharing this clear tutorial.
ReplyDeleteWow! This is fantastic! Thank you very much for posting! :)
ReplyDelete_______
Lee Ann
Crochet...Gotta Love It! Blog
YouTube Channel
#crochetgottaloveit
#crochet
I am featuring this on my yarn shop facebook page https://www.facebook.com/PerfectlyKnotty because I LOVE "unpatterns" and how they are SO unique and totally customizable! Nice job! :)
ReplyDeleteits people like you who keep me picking up my crochet hooks again and again thank you
ReplyDeleteOh so cute! So creative you are. For a first time to create your own pattern, I say Bravo, great job.
ReplyDeletewow...this is beautiful, I can't wait to pick out yarn and get started. thanks for the pattern!
ReplyDeleteAmy I hope you still look at the comments I do not understand how to make the arm holes Do you tie of after the three spaces and then go on to the seven? This is the first time Ive tried to make my self something and I was really proud of it but those dang arm holes PLEASE can you explain it in a first grade way? Thanks Shellet
ReplyDeleteHelloo, I just loved this pattern and busy with it, now that I understand the pattern the circle is getting bigger and bigger. I have now come to my correct size to start the sleeve gap, but as I am doing with 4 ply wool, my amount of stitches are 23 between spaces and I have measured on my other jackets that I need about 40 stitches as a nice size gap. So my question is? Can I use two spaces of the circle, so I will have 46 FDC OR do I make 46 FDC but join on ch1 space after 23 stitches? Please your assistance with this will be highly appreciated. Regards Me Xxx
ReplyDeleteI'm going to do your version as it's so customizable and your instructions are great, but I just thought you might like to know that the site where you linked the original knitted baby pinwheel sweater has added an adult crocheted version! https://www.elann.com/commerce.web/Product_freePatternsDetail.aspx?id=125153
ReplyDeleteSo, I saw this amazing circle sweater, but alas, it's knitted. ... sweatercoat.blogspot.com
ReplyDeleteHi and thanks for all advises and for this amazing sweater. I crochet this now and have some doubts about sleeves - i mean sleeve holes. I am worry if there are so tight instead the diameter of the circle is enough about my arms.
ReplyDeleteI have two questions. One how do I get the hood and do you think it would work out if I changed the stitch for example instead of DC I used hdc or maybe fpdc and dpdc?
ReplyDeleteThank you for the beautiful pattern and the simple steps. Looking forward to making one for myself Snr maybe getting orders.
ReplyDeleteI'm pielady, email is maryabaribeau@yahoo.com.
Thank you thank you for making this so easy! I have been searching all morning for this pattern or one like it! I will definitely mention the designer if I make any of these lovely sweaters to sell.
ReplyDeleteHi there, I was wondering if there is a video tutorial for this project anywhere please? I love Crochet but find reading patterns very difficult if not impossible, I always find video patterns to follow since I find it much easier to understand if I can see what's being done and hoped there was maybe a video for this project?
ReplyDeleteIs there decing on top and underarm area of sleeve? Would you post a picture of the sleeves laid out?
ReplyDeleteIs there decing on top and underarm area of sleeve? Would you post a picture of the sleeves laid out?
ReplyDeleteAm I missing a print option or do I just highlight and print selected? I love this pattern and also the Deborah Norville yarn choice ♥
ReplyDeleteI love this! I'm making it with red heart boutique yarn! It's labeled as worsted, but it's thinner than other worsted yarns, in my opinion. Thanks for the pattern!
ReplyDeleteI love the pattern but I'm having trouble getting the swirl pattern started. I've restarted 3 times and can't figure out what I'm doing wrong. Can anyone help.
ReplyDeleteWow this looks like a challenge as I am a beginner, but optimistic I can do this! :) Thanks for the cool pattern.
ReplyDeleteWow this looks like a challenge as I am a beginner, but optimistic I can do this! :) Thanks for the cool pattern.
ReplyDeleteI would also love to see this as a video tutorial. Like mentioned by another crafter above, I learn more easily by being shown than trying to read patterns. The sweater looks fantastic!
ReplyDeletewhen you say, "continue in pattern above", do you mean all the rows or just the last one? so far it looks great!
ReplyDeleteI love this pattern.thank's for sharring.I have a question.What about if the armholes are too small.i mean how can i make them bigger because they are too tight???Thank you for your time...
ReplyDeleteThis k you so much for taking the time to convert this pattern! I'm a knitter as well but love how quick crochet patterns are. This.is perfect and can't wait to finish mine!
ReplyDeleteHow many yards would be needed to make an adult sweater? TIA!
ReplyDeleteI don't quite understand how to do the arms. The pattern says you will not be joining the rounds. Isn't this done in the round like the body or does this mean you crochet back and forth and sew the length of the arm seam after you've reached the length? Also, by ch1 & sk1 is this creating a pinhole effect like on the sweater body? I would really appreciate some help on this.
ReplyDeleteThanks a bunch for sharing your pattern can't wait to try it out 😊
ReplyDeleteHiya! Love your sweater and I'm making one, I think. I'm having sleeve issues though. My face doesn't seem as smooth as yours, it is like a stepping up a row. Also you say in yours, in the previous row you had 19 stitches therefore you fdc 19 stitches. If you increase every row should there not be 20 fdc? Otherwise those two sections, would from this point on, be one stitch less than all other sections. Thanks for your help.
ReplyDeleteNevermind, it evens out after a couple of rows but I did do an increase and a chain one in the arm hole row.
DeleteI finally finished it. It turned out beautifully.
ReplyDeleteHello! This is my first sweater project and I'm so excited about it! But I'm having some trouble and hoping someone can help me. I'm using handspun silk that I've chain plied to thicken up a bit. I'm at the point where it's the right shoulder width, but I only have 13 stitches in each section of the pinwheel, definitely not big enough for an arm hole. Has anyone else run into this problem? The yarn isn't super big, maybe a little bit thicker than a standard medium gauge yarn. Am I missing something? If it helps, I have 14 rows from center to outer edge. Thanks so much in advance!
ReplyDeleteI haven't done it yet, but I don't think I'll like the flap at the back of my neck, my long curly hair will get knotted and not lay nice, just like a hoodie. I'm going to try slip stitching the top most section during rounds to cut down on the length. Everything else will be done as written . I'll try to update when I'm done.
ReplyDeleteUpdate: the yarn I'm using (lion brand shawl in a ball) is fuzzy and the slip stitches were too tight so I'm doing single crochet instead. The pattern says there are 3 sections between armholes at top and I am doing sc on 2 of them but evenly spaced out. So the 1st section has 1/2, then a whole section, then 1/2 section. I hope this works to cut out the floppyness at the back of the neck!!
DeleteThis is awesome - amazingly simple, totally gorgeous. I do have one question, though: as I'm working on the circle, i've noticed it has a tendency to curl up around the edges. Is it supposed to do that?
ReplyDeleteO.k. - almost finished. However, I don't think it's ever going to fit ME as I have broad shoulders and narrow hips, and if I make the circle big enough to around me on top, it's going to be long enough to reach my knees! Clearly a present for a skinny friend....
ReplyDeleteOk dumb question... I'm trying to make this but am not sure how to start. It says FDC but does not say how many. And do I slip stitch it together for my starting circle? I am happy to buy a complete pattern if there is one available
ReplyDeleteI love this pattern but am not able to crochet, so would need the pattern for knitting it, do you have this or know where I can get it please? many thanks Linda
ReplyDeleteGo to garnstudio.com and search for women/knitting/circle and you will find many patterns for circle vests and sweaters. They are free to download.
Deletehttps://www.garnstudio.com/pattern.php?id=5288&cid=17
DeleteThe CCTV market in Pakistan is growing rapidly due to increasing demand for security in homes and businesses. Many cities now have a wide range of surveillance options available, making it easy to find a CCTV camera shop nearby. Whether for residential or commercial use, modern systems offer smart features at competitive prices.
ReplyDeleteThe demand for surveillance solutions in Pakistan is on the rise, driving steady growth in the CCTV market. With improved accessibility, it's now simple to locate a security camera store close to your location. From homes to offices, advanced systems are available to suit every security need.
ReplyDeletePakistan's CCTV industry is expanding quickly as more people prioritize safety and monitoring. It's now easier than ever to find a local shop selling surveillance cameras in most urban areas. These systems offer smart features tailored for both personal and business security.
ReplyDeleteThe CCTV market in Pakistan is rapidly evolving as security becomes a top priority for many. You can now easily discover a nearby surveillance equipment store offering a wide range of solutions. These modern systems are ideal for enhancing protection at homes, offices, and public places.
ReplyDelete